Catchers: Tips, Drills, Information, Catching Equipment, Catchers Gear |
Basic
Skills
Stance

 -Relaxed
Stance -Relaxed
Stance

 -Ready Stance -Ready Stance

Setting Up

Receiving

Framing

Blocking

Throwing

Leadership
In-depth Skills
Relays,
Cutoffs, and Plays at Home

Signals

Calling A Game

Catching Bullpens

Covering Bases

Pre-Game Routine

Umpire Rapport

Misc. Situations and Plays

 Glossary
 |
 |
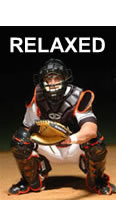
  A general stance most catchers use with the bases empty and less than
two strikes is called a "relaxed" stance. The relaxed stance begins
by squatting with your feet shoulder-width apart. Your hips and shoulders
should be square to the pitcher and your feet straight across or slightly
(an inch or two) staggered. In other words, when looking down at home
plate your feet should be parallel with the front edge of the plate
(i.e. straight across). Your weight should be on the insides of your
feet and you must be balanced. Balance is key. You should not be falling
over and it should be difficult for someone to push you over. Get as
low as comfortably possible while still being in an athletic position
ready to react to anything. The purpose of getting low is to allow the
umpire to clearly see and call pitches in the lower half of the zone.
Every catcher is different so you should experiment and find a stance
that is comfortable and balanced.
Setting a proper arm position and arm angle are important. Your receiving
arm (mitt hand) should be relaxed (somewhere near the middle of being
completely straight and being completely bent toward your chest) and
your palm should be pointed at the pitcher. DO NOT set up with your
receiving arm straight or you may interfere with the batter's swing
(catcher's interference). DO NOT have your arm totally bent, as this
will slow your ability to react to wild pitches. Being extended or completely
bent will also hamper your ability to receive and frame pitches. Your
elbow should be below your mitt. This helps in framing pitches that
are low and to the left side of your body (your elbow has less distance
to travel to get around the pitch). For right-handed catchers (most
catchers are right handed), your throwing hand should be behind your
right shoe to avoid being hit by a fouled pitch. I even like to stick
my thumb in the back of my shoe.
Present a Good Target
Present the pitcher with a good target. Your mitt should be held just above your knees or the knees of the batter. Your
mitt should not obstruct your vision. A good rule of thumb is to provide your pitcher with a target as soon as he begins
his windup. If the pitcher is in the stretch position, present a target after you give your sign. You may have to adjust
this depending on how quickly the pitcher delivers to the plate. As the pitcher delivers, you can relax your wrist. This
is more comfortable and will allow you to react quicker than with a tense wrist. As you catch the ball, firm up your wrist
so the ball doesn't drag you mitt backwards. Remember your arm position and set a good target!!!
KEYS: Square to Pitcher, Comfort, Balance, Low Athletic Position, Arm
Position, Palm Toward Pitcher, Target, Relaxed Stance
Advanced Tip: Drop your left knee slightly to allow for a greater range of motion
with your receiving arm. This way your knee does not interfere with
the movement of your arm and you can more easily frame a pitch down
and in on a right handed hitter. |
 |
 Catching 101
OnBaseball.com

|

